

“I know I need a new roof, but I have no idea what actually happens during the process. Will my house be exposed to weather? How long will workers be here? Can I stay home? What if it rains?”
These are completely normal concerns! A roof replacement is a significant investment and major home improvement project. The unknown can feel overwhelming, especially when you’re trusting contractors to essentially take the top off your house and rebuild it.
Here’s what we’ve learned after managing roof replacements throughout Chester County and Montgomery County: homeowners who understand the process from start to finish experience far less stress, communicate more effectively with their contractors, and end up significantly more satisfied with the results.
That’s exactly why we created this comprehensive timeline guide. By the time you finish reading, you’ll know every single step of the roof replacement process—from that first inspection appointment to the moment you sign off on your beautiful new roof. No surprises, no confusion, just clear expectations and the confidence that comes from understanding exactly what’s happening to your home!
Whether you’re actively planning a roof replacement or just researching for future reference, this guide will prepare you for a smooth, professional experience. Let’s walk through this together, step by step.
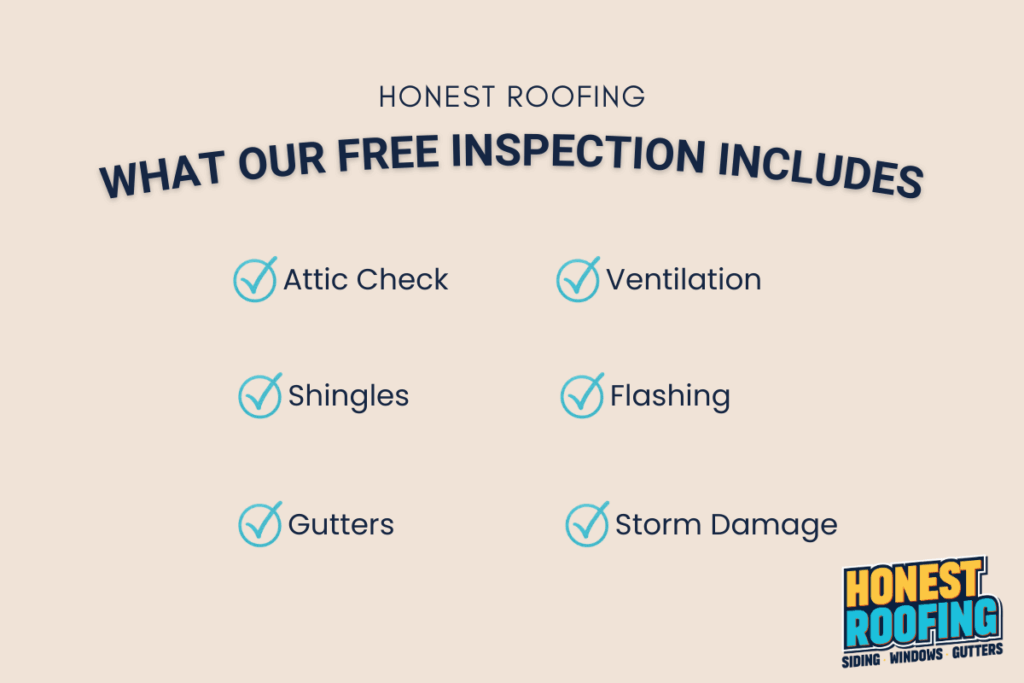
Step 1: Initial Roof Inspection – Where Everything Begins
Your roof replacement journey starts with a thorough, professional inspection. This isn’t a quick glance from the driveway—it’s a comprehensive assessment that reveals exactly what’s happening with your roofing system.
What happens during the inspection:
A qualified roofing professional will carefully examine every aspect of your roof, including your shingles and underlayment to check for wear patterns, damage, and remaining lifespan. They’ll assess your ventilation and attic health, looking for proper airflow, adequate insulation, signs of moisture problems, and any mold or mildew issues that could indicate underlying problems.
The inspector will evaluate your roof decking stability, checking for soft spots, water damage, structural integrity, and whether the foundation of your roof is sound enough to support new materials. They’ll also examine all flashing around chimneys, skylights, vents, and valleys—these are critical areas where leaks most commonly develop.
Your gutters won’t be overlooked either. The inspector will check their condition, proper attachment, and drainage effectiveness, since gutters play a crucial role in protecting your new roof investment.
What you’ll receive:
After the inspection, you’ll get a detailed explanation of all findings presented in terms you can actually understand—no confusing jargon or technical talk designed to intimidate you. You’ll learn about recommended materials specifically suited to Pennsylvania’s climate and your home’s needs, along with honest, transparent pricing with no hidden fees or surprise costs.
This is also your opportunity to ask every question on your mind! A reputable contractor welcomes questions and takes time to ensure you feel completely confident in your decision. If someone rushes through this phase or makes you feel pressured, that’s a red flag.
Timeline: The inspection typically takes 45 minutes to 2 hours, depending on your roof’s size and complexity. You’ll usually receive your detailed estimate within 2-3 business days.
Step 2: Material Selection & Scheduling – Making Your Choices
Once you’ve reviewed the estimate and decided to move forward, it’s time to make some exciting decisions about your new roof! This is where your vision combines with professional guidance to create the perfect roofing system for your home.
Choosing your materials:
You’ll work with your contractor to select the shingle type and color that complements your home’s style while providing the durability and performance you need. Pennsylvania homes face unique weather challenges, so your contractor should guide you toward materials that handle our heavy snow loads, ice dams, summer heat, and storm exposure.
You’ll also discuss ventilation upgrades that might benefit your attic space and extend your roof’s lifespan. Proper ventilation is crucial for preventing ice dams in winter and reducing cooling costs in summer—it’s an investment that pays dividends for decades.
Underlayment materials are another important choice. Modern synthetic underlayments offer superior protection compared to traditional felt, and your contractor can explain the benefits of each option. You’ll also select flashing materials and other accessories that ensure every vulnerable point on your roof is properly protected.
Scheduling your project:
Your contractor will work around both weather conditions and your availability to find the optimal installation window. Pennsylvania weather can be unpredictable, so flexibility is important. Most contractors aim for dry conditions with moderate temperatures for the best installation results.
You’ll receive a clear start date, expected completion timeline, and information about what happens if weather delays occur. Professional contractors maintain excellent communication throughout this phase, so you’re never left wondering when work will begin or how long it will take.
Timeline: Material selection and scheduling typically happens within a few days to a week after you approve the estimate. Installation is usually scheduled 1-4 weeks out, depending on the contractor’s workload and weather conditions.
Step 3: Pre-Installation Preparation – Getting Your Home Ready
The day before or morning of your installation, there are simple preparation steps that protect your property and ensure a safe, efficient work environment.
What you’ll need to do:
Your contractor will provide a detailed checklist, but typical preparations include moving vehicles from the driveway and street areas where the dumpster and equipment will be positioned. You’ll want to clear patio furniture, grills, decorative items, and anything near the house that could be damaged by falling debris.
Keep pets safely indoors throughout the installation—the noise, activity, and open gates create stress for animals and potential safety issues. If you have items stored in your attic, cover them with tarps or sheets to protect against dust that can filter down during the tear-off process.
Remove wall decorations on upper floors, as vibrations from roof work can cause pictures and shelves to shift. It’s also wise to warn neighbors about the upcoming work, especially if you live in a closely-spaced neighborhood where noise might be disruptive.
What your roofing team will do:
Professional roofing crews take property protection seriously. Before any work begins, they’ll place protective coverings around your landscaping, including tarps over garden beds, shrubs, and flowers near the house. They’ll protect your siding with plywood or specialized guards, preventing damage from falling materials or ladder placement.
Windows get covered or protected, especially ground-level windows near work areas. Driveways and walkways are covered with tarps to catch nails and debris, making cleanup easier and protecting your concrete or pavers from damage.
A dumpster or trailer is strategically positioned for efficient debris removal, and safety perimeters are established to keep family members and passersby away from the work zone.
Timeline: Pre-installation preparation by homeowners takes 30 minutes to an hour. Professional crews typically spend 1-2 hours setting up protective measures before actual roofing work begins.
Step 4: Tear-Off of the Old Roof – Demo Day
This is where the action really starts! The tear-off phase is the most dramatic part of the process, but don’t worry—it’s also highly organized and executed with precision.
What happens during tear-off:
The crew begins systematically removing all existing roofing materials from your home. This includes every single shingle, all the old underlayment, countless nails embedded in your roof deck, and worn-out flashing that’s no longer providing adequate protection.
This stage is admittedly noisy. You’ll hear the scraping of removal tools, the sound of materials sliding down into the dumpster, and the general activity of a busy work crew. But here’s the good news: tear-off happens fast! Most residential roofs are completely stripped in just 3-6 hours.
Safety and cleanliness during this phase:
Professional crews maintain strict safety standards throughout the tear-off. This includes fall-prevention equipment like harnesses and secure ladder placement, clean walkways free of debris, and protective tarps that catch falling materials and protect your property.
The team works efficiently to minimize the time your roof is exposed. In most cases, they’ll complete the tear-off and have new underlayment installed by the end of the first day, so your home is never left vulnerable overnight.
What you’ll experience:
Expect noise and activity, but you can absolutely stay home during this phase if you choose. Many homeowners go to work as usual, while others prefer to be present. Either option is fine—just know that you won’t be able to have normal conversations during the loudest tear-off hours.
The vibrations throughout your house are normal. That’s why we recommended removing wall decorations earlier! Your attic will get dusty despite the crew’s best efforts, which is why we suggested covering stored items.
Timeline: Tear-off for an average residential roof takes 3-6 hours, depending on roof size, complexity, and how many layers are being removed.
Step 5: Decking Inspection & Repairs – The Foundation Check
Once your old roof is completely stripped away, something important happens: your roof deck becomes fully visible for the first time in decades. This is actually a critical advantage of the tear-off process—it reveals exactly what condition your roof’s foundation is in.
What the inspection reveals:
With the deck exposed, your roofing team carefully examines every square foot of plywood or OSB sheathing. They’re looking for soft spots that indicate water damage, rot from prolonged moisture exposure, cracks that compromise structural integrity, and sagging areas that suggest underlying support issues.
This inspection is thorough because your new roof is only as good as what it’s installed on. Even the highest-quality shingles won’t perform properly if they’re attached to compromised decking.
When repairs are needed:
If problem areas are discovered—and it’s not uncommon to find some issues on older roofs—they’re addressed immediately. This might involve replacing entire sheets of damaged plywood, reinforcing areas with additional support, addressing any structural concerns before moving forward, and ensuring every inch of your roof deck is solid and secure.
Here’s something important: reputable contractors always inform you before making repairs that add to your project cost. They’ll show you the damaged areas, explain why repairs are necessary, and get your approval before proceeding. If someone just adds unexpected charges without consultation, that’s not acceptable.
Why this step matters:
Think of your roof deck like the foundation of a house. You wouldn’t build a beautiful new home on a crumbling foundation, right? The same principle applies here. Repairing damaged decking now ensures your new roof will last its full expected lifespan—20, 30, even 50 years depending on your material choice.
Skipping necessary deck repairs is one of the biggest mistakes homeowners and contractors can make. It might save money today, but it guarantees problems and premature failure down the road.
Timeline: Deck inspection happens as soon as tear-off is complete. Most repairs can be completed within 1-3 hours, though extensive damage might require additional time.
Step 6: Installation of Your New Roofing System – Building Protection Layer by Layer
Now comes the exciting part—watching your new roof take shape! Modern roofing systems are sophisticated, multi-layer assemblies designed to provide decades of reliable protection. Each layer serves a specific purpose.
The installation sequence:
First, your crew installs the ice and water barrier, a self-adhesing membrane applied to vulnerable areas like eaves, valleys, and around roof penetrations. This barrier provides critical protection against ice dam water backup and wind-driven rain—essential in Pennsylvania’s climate.
Next comes the synthetic underlayment, a water-resistant layer that covers your entire roof deck. Modern synthetic underlayments are far superior to old-fashioned felt paper, offering better tear resistance, weatherability, and protection if installation is delayed by weather.
Drip edge is installed along all roof edges, directing water away from fascia boards and into gutters. This often-overlooked component prevents wood rot and extends the life of your roof edge.
All flashing is carefully installed around chimneys, skylights, vent pipes, and valleys—anywhere two roof planes meet or where something penetrates your roof. Proper flashing installation is crucial because these are the most common areas for leaks to develop.
Starter shingles go down along the edges, providing a secure base for your main shingle courses. Then the main shingles are installed, working from bottom to top in overlapping courses that create a weatherproof barrier while giving your roof its finished appearance.
Finally, ridge vents are installed along your roof peak to allow hot air and moisture to escape your attic, and ridge cap shingles are applied to seal the ridge while maintaining ventilation. This completes your roofing system.
Quality installation practices:
Professional installers follow manufacturer specifications exactly. This ensures your warranty remains valid and your roof performs as designed. They use the correct number and type of nails per shingle, maintain proper shingle alignment and exposure, seal all necessary areas with roofing cement, and ensure every component is installed according to code and best practices.
Weather monitoring continues throughout installation. If conditions turn unfavorable, professional crews will properly secure the work area and resume when conditions improve. Your home’s protection is never compromised.
Timeline: Installation for an average residential roof typically takes 1-2 days, depending on size, complexity, material type, and weather conditions. Some larger or more complex roofs may require 3 days.
Step 7: Full Cleanup & Property Protection – Leaving Your Home Better Than They Found It
A reputable roofing company understands that the job isn’t finished when the last shingle is nailed down. Thorough cleanup is a hallmark of professional service, and it’s where quality contractors truly distinguish themselves.
The meticulous cleanup process:
One of the most important cleanup steps is the magnet sweep. Your crew will use powerful magnetic tools to sweep your entire property—driveway, walkways, lawn, garden beds—picking up nails and metal debris that could damage tires or injure family members and pets. This process is repeated multiple times to ensure nothing is missed.
All roofing debris and materials are completely removed from your property. The dumpster or trailer that’s been catching old shingles throughout the project is hauled away, along with any packaging materials, empty boxes, or other installation-related waste.
Your gutters are inspected and cleared of any debris that may have fallen during the project. Garden beds are raked clean of granules or small debris. Driveways are swept or blown clean, and any protective coverings are carefully removed without damaging your landscaping.
The crew also performs a visual inspection of your yard, siding, and surrounding areas, looking for any materials or debris that might have been scattered during the tear-off or installation. Your home should genuinely look cleaner than when the team arrived!
Going the extra mile:
Quality contractors take pride in leaving your property in pristine condition. This might include touching up any minor siding marks that occurred despite protective measures, replacing moved items to their original positions, and ensuring all equipment, tools, and materials are completely removed from your property.
Some companies even offer to take photos of your completed roof from multiple angles, giving you documentation for insurance records and simply beautiful images of your investment.
Timeline: Comprehensive cleanup typically takes 2-3 hours after installation is complete, depending on property size and project complexity.
Step 8: Final Inspection & Walkthrough – Ensuring Your Complete Satisfaction
The final walkthrough is your opportunity to see the completed work, ask questions, understand your warranty, and ensure you’re 100% satisfied with your new roof. This step should never be rushed!
What happens during the walkthrough:
Your project manager or lead contractor will review the full installation with you, walking you through what was completed and pointing out key features of your new roofing system. They’ll explain how your ventilation system works, show you the quality of flashing installation, and highlight any additional work that was completed beyond the original scope.
They’ll confirm that all work meets workmanship standards, building codes, and manufacturer specifications. You’ll have the opportunity to ask any remaining questions about maintenance, warranty coverage, what to watch for in the coming months, and anything else on your mind.
Documentation you’ll receive:
You should receive comprehensive warranty information including both manufacturer material warranties and contractor workmanship guarantees. You’ll get documentation of all materials used, including shingle type, underlayment, ventilation products, and any other components.
Professional contractors also provide maintenance recommendations specific to your new roof and Pennsylvania’s climate. Some offer photos of the completed installation, receipts and invoices for your records, and information about scheduling future inspections if desired.
Your satisfaction matters:
A reputable contractor wants to ensure you’re completely satisfied before they consider the job complete. If you notice anything that concerns you or have questions about any aspect of the installation, this is the time to address it. Professional companies stand behind their work and will address any legitimate concerns promptly.
Don’t feel pressured to sign off on work if you have unresolved questions or concerns. A quality contractor welcomes scrutiny and takes pride in delivering exceptional results that exceed your expectations.
Timeline: The final walkthrough typically takes 30-60 minutes, depending on your questions and the complexity of the project.
How Long Does a Roof Replacement Take?
Now that you understand each phase of the process, let’s talk about overall timeline expectations.
Typical timeline for residential roofs:
Most residential roof replacements are completed in 2-3 days from start to finish. This includes tear-off, deck inspection and repairs (if minimal), full installation of the new roofing system, and comprehensive cleanup. For average-sized homes (1,500-2,500 square feet) with standard asphalt shingle installation, this timeline is very achievable.
Factors that affect timeline:
Roof size obviously impacts duration—larger roofs take more time. A 3,000+ square foot roof might require an additional day or two compared to a smaller home.
Complexity matters significantly. Multiple dormers, complex valleys, numerous skylights or chimneys, steep pitches, and intricate architectural features all add time to the installation process.
Material type affects timeline as well. Asphalt shingles are fastest to install, metal roofing typically takes longer due to precise measurements and custom fitting, and tile or slate installations can take significantly longer due to the weight and installation requirements.
Weather conditions can delay projects. Rain obviously stops work, as installation cannot happen on wet surfaces. High winds make working at heights dangerous and can blow materials around. Extreme heat or cold can affect material performance and worker safety. Professional contractors never compromise safety or quality to meet arbitrary deadlines.
Unexpected repairs discovered during deck inspection can add time if extensive decking replacement is needed, though most repairs add only a few hours to the overall timeline.
Your contractor’s communication:
Before work begins, your contractor should provide a clear timeline estimate based on your specific project. They’ll explain what might cause delays and how they’ll communicate any changes. During the project, they should keep you updated on daily progress and any adjustments to the schedule.
Professional contractors build slight buffer time into their estimates to account for unforeseen circumstances, so you’re not constantly dealing with timeline surprises.
What to Expect After Your Roof Replacement
Your new roof is installed and looks beautiful! But what happens next? Understanding post-installation expectations helps you get the most from your investment.
Immediate post-installation:
You might notice a slight “new roof smell”—this is normal and dissipates within a few days. Asphalt shingles contain petroleum-based materials that emit a faint odor initially. It’s nothing to worry about!
Granule shedding is also completely normal during the first few months. New shingles shed excess granules that weren’t firmly embedded during manufacturing. You’ll see these in your gutters after rain—this is expected and doesn’t indicate a problem.
Some shingles may appear slightly different in color or lie flatter than others initially. This is normal! Shingles undergo a “sealing” process where heat from the sun activates the adhesive strips. Within a few weeks to months, all shingles will lie flat and uniform.
Maintenance recommendations:
Schedule annual inspections, ideally in spring or fall, to catch minor issues before they become major problems. Keep your gutters clean to prevent ice dams and water backup that could compromise your new roof. Trim overhanging tree branches to reduce debris accumulation and prevent physical damage to shingles.
Address any issues promptly—even with a new roof, if you notice something unusual, contact your contractor. It’s likely nothing serious, but early attention prevents minor concerns from becoming warranty-voiding damage.
Long-term expectations:
With proper maintenance, your new asphalt shingle roof should last about 20 years, metal roofing can last 40 years, and quality synthetic materials offer 30 years of protection. Your investment will protect your home through decades of Pennsylvania’s toughest weather!
Ready to get started on your roof replacement journey?
Understanding the complete roof replacement timeline transforms what could be an anxiety-inducing experience into a smooth, manageable process. From that first inspection through your final walkthrough, each step has a clear purpose and follows a logical progression designed to deliver exceptional results.
The key to a positive roof replacement experience is working with professional contractors who communicate clearly, respect your property, follow industry best practices, and stand behind their workmanship. When you understand what to expect at every phase, you can make informed decisions, prepare your home properly, and enjoy the confidence that comes from knowing your investment is being handled by experts.
Your roof is one of your home’s most critical components—it deserves professional attention from contractors who treat your home with the same care they’d give their own. With the right team and a clear understanding of the process, your roof replacement will deliver decades of protection, increased home value, and the peace of mind that comes from knowing your family is safe under a beautiful, durable roof.
We provide professional roof replacement services throughout Chester County, Montgomery County, and all of southeastern Pennsylvania and New Jersey. Our experienced team follows every step of this process with meticulous attention to detail, clear communication, and unwavering commitment to your satisfaction.
Request your free roof replacement estimate today! Call us at 484-369-0040 or schedule your inspection online. Let’s walk through this process together and give your home the beautiful, protective roof it deserves. We’re here to answer your questions and ensure your roof replacement is a positive, stress-free experience!